Posts

Showing posts from October, 2024

Weekly Blog 7 : HDRI backdrop in Unreal Engine
Image
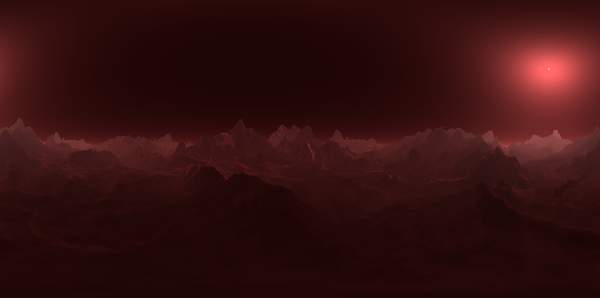
  This week, I was learning HDRI backdrop and scene capture in Unreal Engine. They are tutorials which I referred to create HDRI backdrop. Both tutorials are so helpful to use HDRI in Unreal Engine. I'm going to simply explain steps to create a HDRI backdrop from the scene in Unreal Engine. 1. Prepare the scene which you want to use as HDRI. 2. Create "Scene Capture Cube", choose texture target itself, and create texture file in the folder in content browser 3. You can move the scene capture cube and change the image to capture. If you want the scene to look bigger, move the cube to a lower position. To do the opposite, move the cube to an upper position.  4. Double click to choose the texture file and change resolution bigger.  5. Right click the texture file and create a static texture. 6. Asset Action > Export it as HDR file. These are general steps to create HDR images from the scene view. This technique is useful to other projects, too. And these will be the steps...

Weekly Blog 9 : UV

Image
This week, I created 5 UV maps out of 6-7 materials (I'm going to add other objects and attach them to new material). I could focus on creating UV maps because I separated some meshes such that I could make UV easily.  I've almost finished creating UV maps, so I'll have time to create 2 more objects. It won't be too hard to create, suggestions are wall clock, neon board (just create curve and sweep) and wall with the door.  Counter objects are big and the player might watch carefully, so I created my own materials for them. If I combined it with other objects, smaller objects might look low-resolution. I was careful to keep the face-shape of UV. And I made the edges horizontal or vertical as possible as I could.   I did not use the align tool because I wanted to group the object UV shells close to each other. When I add textures on a 2D view, it can also be easy to edit the whole object if UV shells are close to each other. Of course, I am always careful with the tex...

Weekly Blog 6 : Map for HDRI sky 【CAGD 495】

Image
       I decided to create a map for HDRI sky because the terrain object of our group looks smaller than I thought. In the rendered video, I saw the horizon of the skybox and I felt that the scene is on an isolated island. I suggested my idea to create HDRI sky and worked on that this week. My first idea was to create material in Sampler and terrain by a terrain generator inside of Unreal Engine. It did not seem to look good, so I decided to use Gaea and studied how to use it. After generating the map mesh and texture, I exported to Maya because I could not read the mesh data in Unreal Engine. Error message showed that the degeneracy Polygon cannot be imported. When I imported it to Maya, there’s a weird shadow on the surface. To solve this problem, I clicked “unlocked normal” in Maya and weird shadows were deleted. Also, I edited the shape of the mesh a little bit in Maya too. I just want to make the horizon hide with sharp mountains, so I decreased the height of th...

Weekly Blog 8 : Coffee maker and Stove

Image
This week, I was creating Stove and Coffee maker. It reached my goal to create a stove and coffee maker. However, it took much longer than I thought. Most of the modeling is finished, so I’ll move to UVing starting next week. Just in case, I was taking extra weeks to work on UV, texturing, and rendering. So, if other models are necessary after creating UV every object, I have time to create several models. I think I can say that it’s following the schedule. For a coffee maker, it took a long time to create details. Each part does not take a long time, but there are several parts. So, I guess I do not feel it took a long time, but as a result, it took longer to finish up. I was especially focusing on the proportion of body and coffee spout. I used a lattice tool and compared their shape carefully. For the other spout, I was using a smooth preview to shape the object. The angle which spouts come from is not horizontal or vertical, so it was hard to create it such that it is symmetrical. ...

Weekly Blog 5 : Decals 【CAGD 495】

Image
  This week, I was challenging Substance Designer and Decals. I am a beginner in using Substance Designer and studying with a tutorial, so it took a long time to generate this simple map. The hardest part is to delete the circle which is the border of the clip. To solve this problem, I prepared other circles and attached them to the other channel of the blend node. After making a pattern, I created normal, 2 base color, and opacity (gray scale) output nodes and exported them to Photoshop. After exporting to Photoshop, I merged 2 base color maps and created 1 base color map. I had already decided one base color will be the top and the display style will be overlayed. I think this process was successful and could express cracks that are a little bit burning and shining.  Inside of Unreal Engine, I created decals with attaching base map, Opacity map, normal map, and emission map. There was no plan to put an emission map. But I attached it because the whole scene is in low light i...

Weekly Blog 7 : Juke Box

Image
       For this week, I was modeling a retro Jukebox. My plan was to model more than 3 models, so it did not reach my goal. The reason is that I did not understand the structure of the Jukebox well and the shape is complicated to model.      The key technique for this week is a combination of different objects/meshes. If all meshes are connected in a complicated shape object, there’re lots of edges and faces. I modeled each piece in separate objects. Other tube was created by a sweep tool. But the image above is created by duplicated faces from the body of Jukebox. The reason why I chose this process is because I wanted to make a border natural. If every vertex on the mesh border is not matching, holes can be seen from the gap and need extra faces. For menu pads, they are almost separate objects, pole structure and blade structure objects are all separated. I am planning to add an emission map, so there's mesh on the back of them and a part of the base...

Weekly Blog 4 : Texturing Bridge [CAGD 495]

Image
  This week, I was working on texturing the bridge. I was especially focusing on the height and normal map. While I was modeling bricks, I had a problem that the borders of UV shells are emphasized and can see the mesh borders. This problem happened because of the “height to normal” filter. I was generating bricks with a height map and tried to make it normal. However, we will export and render in Unreal Engine, so I noticed that it is not necessary to export everything in a normal map and deleted that filter. To avoid that problem, I also changed the texture layer for the top of the pillar. The side texture was fine but it is Tri-planar projection, but the top should be planar projection. For the metal part, I used both a metal edge generator and roughness grunge map to express a more realistic surface.  For the brick on the road, first, I generated it in Substance Sampler and exported it to the painter. While I painted them by selecting polygons, the borders of crossing poin...

Weekly Blog 6 : Kitchen

Image
  For this week, I was working on Kitchen stuff. To refer to the opinion in the class meeting, I started to create props and kitchen appliances. To be honest, also this week, I could not do good work for modeling. It reached the quota for this week, but I was planning to do more because the work for last week did not reach the quota. Next week, I’ll do the Jukebox, coffee machine, and stove (if possible). I am planning to use Zbrush for Jukebox to model a metallic detail on it. For the refrigerator, The player will not see top, below, and inside, so I omitted to create them in detail. Polycount is about 1000 and not heavy. To refer to the advice in another class (495), I separated meshes and could decrease the amount of polygons and the curve of nobs looks good. On top of nob, these two images are about comparison of converting and remeshing. The player won't watch carefully at this point, so I made it in small amount of polygons. For the sink, I was careful about its height. To ma...