Weekly Blog 11 : Texturing
This week, I was working on texturing over a half of the materials. It is following the schedule correctly.
To categorize what I did, in general, there are 3 things: fixing UV maps, layering materials in substance painter, and design in Substance designer.


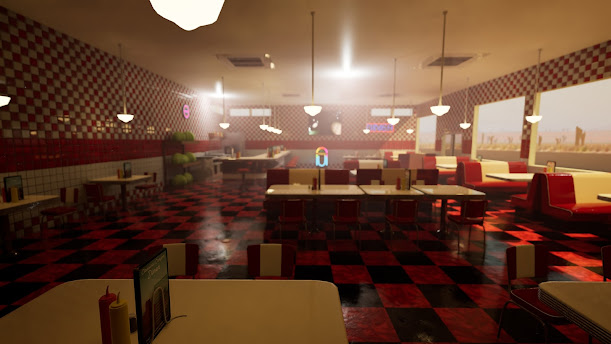
I had a minimum knowledge about Designer because I studied nodes of Designer for the other project. So this was not too hard. But I did trial and error to create my original texture. First problem I faced was the height of the gap between tiles. I wanted it flat, but the center part was rendered as a low position. I solved this problem to blend the same texture but emphasized the gap part with histogram scan node. Second thing is, how do I make a check pattern? Height and other things can be the same in every tile, only color should be checked. To solve this problem, I tried to change the parameter of the tile sample generator, but I could not make it to which I wanted. When I looked for it with google, I found that there is a Checker node in Designer. Total tile amount was 10, so I set the checker amount to 5, created a mask with a checker node, and created a colored checker pattern. There are some small problems, but these two are major problems.
I'm going to write about a particular thing about this tile, not a problem. Color of these tiles were not the same when I checked the reference images, so I changed the color random parameter in the tile sample generator node and made the red color gradations change.

There was a problem after creating a material in Substance Designer. UV and Tri Planner (my favorite) did not work correctly on the wall. I was looking for another projection and I found that the Warp projection worked nicely. This reminded me of Area light in Maya, Unity or other software. This projection works nicely only on 1 side, so I duplicated and changed direction to the other angle when I created tile textures to the other wall.
To make tiles repeated, I focused on the left and right side of edges ending with a gap of tiles. I did not care about the top because it will be next of other material.

There's also a particular point on the floor. Before creating the texture, I created a height and roughness map in Substance Sampler. The reason is that the floor will be repeated and there will be a gap if there is no Make it Tile layer in Sampler. On the left and bottom of the material folder in the above image, you can see the mud-like material. This is which I exported from Sampler.
Check pattern and some grunge texture are from Painter and I do not care about the border because it is a check pattern.


Comments
Post a Comment