CAGD 230 Room
Part2
Checkpoint1
In this checkpoint, I created 3 props and tried to create a hanged cloth on the wall hanger. To avoid a difference in the direction of texture, I was careful to set the rotation of UVs. About a hanged cloth, I was struggling to do it. First problem is that the cloth slides down to the ground. It did not work well even though I added nCloth and a passive collider to the wall hanger, friction was also 1. To solve this problem, I used “point to surface”, selecting a vertex of cloth, Shit + left mouse drag and selecting the model which is attached to a passive collider, and selecting nConstrait ->point to surface.
Tentatively, I could make the model which is looking to be hanged. However, I found other problems. First, the inside surface penetrated the outside surface during the animation. That’s because I created the inside surface first before I run the animation, so I will delete the inside surface or remake the model. Second, the faces of the edges are penetrating each other. To avoid this problem, I will add another point to the surface at the point which is on the edge of the cloth.
According to my studying myself, I made the solution to make the hanged cloth model as, “To make a default model which has the only outside surface, attach nCloth to cloth and passive collider to hanger, select points where I want to fix and passive collider model, select nConstrait -> point to surface, move timeline and stop where I want to freeze the model, delete history and colliders, extend the all surface and make it bigger a little bit”.
In the next checkpoint, I’d like to finish up a hanged model if possible after finishing other props.
Checkpoint 4
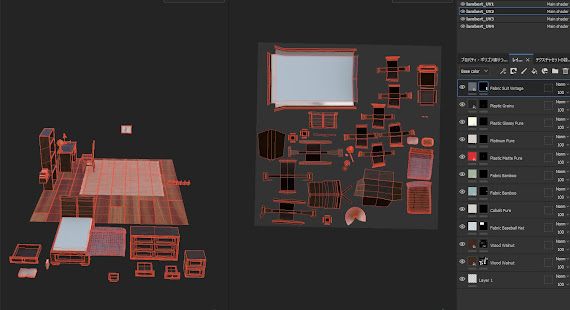
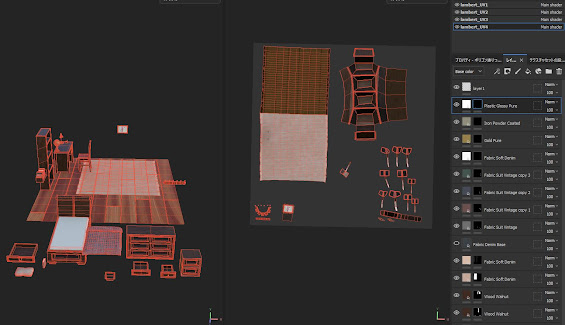
In this checkpoint, I separated 4 UVs as the following assignment. Generally, I wanted to unify the whole texture color of furniture, so I basically used the same texture. But of course I added the same texture again and changed the rotation of it. I could add all the texture on the objects in this checkpoint. However, when I applied the texture on the object, the texture looked too big. Even though I increased the tilling, I could not make it in high resolution. So, I wonder if applying the same material to the other objects is not a good way to make materials. What I think is that we need materials in each type of object. (small objects, walls, bed supplies, etc…) However, if there’s another way to make it high resolution with the same UV map, I’d like to change it.
In the next assignment(I’m not sure there is), I’ll add a jacket or some other small stuff on the bookshelf. Or, I’d like to fix that low resolution problem. And I’ll add more details and export texture maps and import them to Unity.
What I learned in this checkpoint is that texture would go very bad if I did not do correct UV editing. And I also learned that it is also important to create 3D models in the correct way. I’ll try to make models as it would be easier to edit UVs.
In this checkpoint, the new thing I used is a process to make a curtain.
First, I used a pencil curve tool to make the bottom of a curtain. Next, I duplicated twice and made middle and top parts. Then I changed the curve points and changed its shape a little bit to make it more realistic. After duplicating and changing their shape, select curves from the top to the bottom, and click the box of loft. I chose a polygon, square, and set the amount of U (width and express folds) as 120, V (vertical) as 6. When I chose the accept button, the mesh was created. And later, I deleted these three curves. I set the pivot point as the edge on the left and bottom to make it easier to change its shape.
For the other models, I was struggling to do UV expansion of the chair.
The shape was too complicated and I could not find where I should cut the edge first.
Other small models are mostly simple shapes or a gathering of the other models, so they were not
hard to do UV expansion.
For next week, I will make carpet quickly and resize the UV and create textures. I think I’m gonna
create some other models because the wall hook and bookshelf are empty. I’m gonna add glasses
to the window too. I think it will be working if I create and attach new material to the window, and
change transparency in Unity. Also, I’ll challenge myself to express a thin carpet as it will not interrupt
other models.
Checkpoint 2
rendered models
In this checkpoint, I used animation to create a pillow and blanket. I created a cube which is generally shaped like a pillow first, selected FX on the top bar, and chose nCloth -> create nCloth with selecting the object. Next, I made gravity to 0 from 9.8(default gravity acceleration). If I do not, the model goes away. Then I moved a frame below and started animation. It won’t go well if I do not create enough polygons. To create a blanket, I left the gravity as default, but I added a rigid body to the bed. When I set a frame to a good position, a blanket shapes well. Then I fixed details that the inverse sides were shown because the model was thin.(There’s no need to create a thin cubic model, but I designed a blanket in which one side of it is flipped.) To make its mesh into a normal model, I duplicated selected faces and separated them into two meshes.
(not from shot cut, select all faces, duplicate meshes on the bar above, and separate them.)
Professor mentioned in the class and the above is my original solving.
For the other models, I used a mirror modifier and loop cut many times. On the bed model, I created the leg, hole of the drawer, and details of the bed frame, then used a mirror modifier. To create details of furniture, I used many loop cuts and beveled them into 3 or 4.
In UV, I did not special things like modeling a pillow or blanket. I just selected lines of each edge (not the meaning of edge in Maya, corner), cut them, and expanded. If it is still connected, I added another line which will continue to the edge of the outline of the UV shell.

What I did first in this assignment is find the images of the bedroom and make a layout in real layout.
And I found another image of a desk which fit the atmosphere of the bedroom. In this case, I chose
a cool wood as a base color of the twin bed, so I chose a similar color desk. Next, I made and placed
in the real scale with searching the size of a twin bed. Also, I layouted the other huge objects in that
image too. I placed postures, nightstand, stand light, pillows, and dresser in the general shape of the
object. In addition, I added a desk and chair on the block-out scene. I added other things like wall
hangers and pencil stands as a preference, but I did not add it in the scene yet because they are small
objects. I made the mistake of changing a color and adding another lambert to the object in each
different type of texture size. But that seemed to be clear to see what was there.
In this scene, the intensity of the point light is 9,000(point lights on the desk and nightstand)
and 50,000 (point light above) because the reference is 1 meter. When I placed the point light,
nothing was shown in the render view.
For the next step, I’ll be working on modeling as much as I can. Hopefully, I’d like to finish up the bed,
chair, desk, and dresser by next Monday (same texture, same color models).
In addition, I’d like to create modular drawers for the bed and dresser.


Comments
Post a Comment